Blog Widget by LinkWithin

the Pastry Pedestal™ | Creative Styling - Malu Boutiques

Monday, August 15

The creative uses for The Pastry Pedestal™ never cease to amaze me.
I've decided to start showcasing styling ideas on a weekly basis.
The styling inspiration will not only come from me...
but from YOU as well...

Today's styling idea comes from a photo I received from Malu Boutiques...

Brownieswatermarked

Not only is this display gorgeous...
This idea is brilliant!
It's the perfect representation of "thinking outside of the box"...
which has been my ultimate goal with the invention of these versatile pastry displays!!

Thank you Maylene from Malu Boutiques for the inspiration!!


What you'll need to recreate this look:
The Pastry Pedestal™ Starter Kit (12 lucite rounds, 12 lucite rods and 12 rubber rings)
• bead trimming of your choice
• double stick tape
• mini brownie bites

Directions:
1. Wrap six lucite rounds with bead trimming using double-stick tape.
2. Insert 9" lucite rod into TWO lucite rounds for a base. (repeat process to achieve 3 free-standing displays)
3. Slide a rubber ring onto 9" lucite rod followed by a bead-trimmed lucite round...adjusting height to accommodate petite pastry sizes you'll be using.
4. Add another rubber ring and bead-trimmed lucite round to the 9" rod.
5. Repeat steps 3 and 4 for the other two remaining stands.
6. Rest brownie bites on the bottom and middle lucite rounds and then top off with one brownie bite.

Super elegant and fun for your next dessert table...
or even for an extra special birthday surprise at home!!
I LOVE the look.

Be inspired today.

KEEPiNG iT REAL
Only one more week left before school starts...
Busy shopping for school clothes and supplies for my girls...
Where did summer go?


family | happy birthday claracakes

Monday, May 23

Clara celebrated her 15th birthday over the weekend...

At her request...
no fanfare.
Just a simple pool party...
with her best friend Brittany...
her favorite cousin Kalie...
and her family.
Along with a request for an oreo cheesecake for her birthday cake...


I made mini oreo cheesecakes on Saturday... 
I still managed to find a way to sneak in a little bit of party decor by creating a pretty place for the cupcakes.
(I dressed up a styrofoam block with wrapping paper, ribbon and a tissue paper flower.
I then used my adorable cupcake stand to create a focal point.)*wink*


Sunday night we had her birthday dinner request: Hearty Bacon Potato Chowder.
My mom and stepdad showed up with this....

an absolutely delicious oreo cheesecake my mom made...YUM!!


It was a weekend filled with a lot of family time...
something I definitely enjoyed...
and needed!

Happy 15th Birthday Clara!
Love you to pieces!!

Stay tuned for that Father's Day giveaway I mentioned last week!
It's going to be great!!

KEEPiNG iT REAL
As you might imagine...
I'm disappointed Clara no longer wants "themed" parties and would rather keep things simple.
At the same time...
I'm okay with it too. (knowing I can still full focus on Ella for a long time - and possibly squeeze a few more out of Ema). *wink*
I enjoyed taking her for her annual birthday pedicure on Saturday morning.
And as you can see...I can still sneak in a little bit of creativity...
leaving BOTH her and I content with the overall results! *wink*

pretty things...

Wednesday, May 4

Just wanted to share some simple pretty things with you today while I continue
to work out the bugs for The Pastry Pedestal launch...

Adding fabric flowers to cupcakes...
If you are uncomfortable using pins - substitute toothpicks instead.
(If you missed the DiY I did on decorating cakes with paper flowers...check it out here)


A peek at some pretties that will be shared later this week on HWTM...


Sending you all wonderful Wednesday wishes...

KEEPiNG iT REAL
I'm creating the Pastry Pedestal website all on my own...
it's been quite a learning process and I think I've pulled out more than a few strands of my hair along the way! *wink*

Did I already mention I also made some changes to the original logo I shared with you?
Just stop overthinking everything Jessica and just "put it out there!!" *wink*

CRAFT | "LOVE" letters

Thursday, February 3

I am crazy-excited to share with you this clever little craft project I absolutely LOVE!!

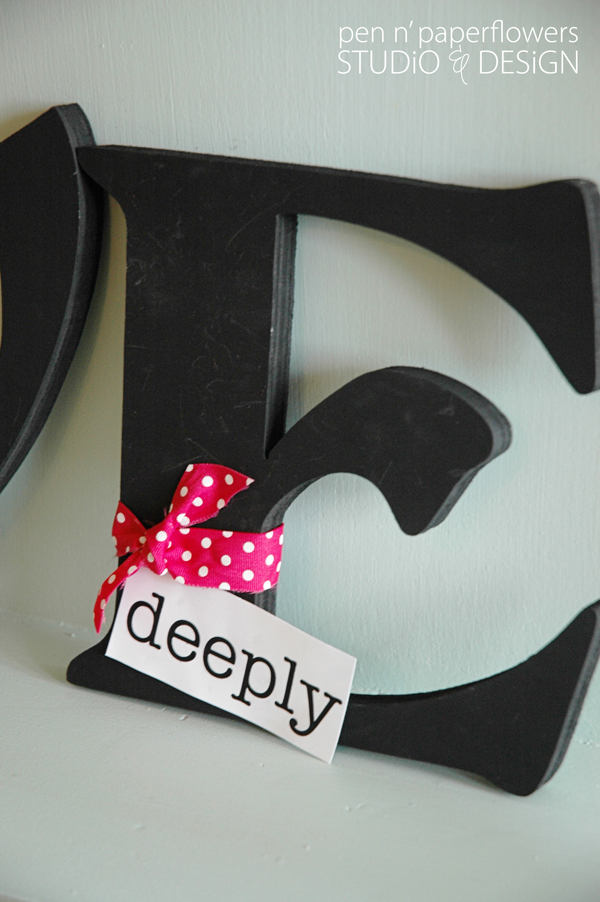
It started out pretty generic with me purchasing wooden LOVE letters for Valentine's Day.
Not an original idea in the least so far, right?
After contemplating what crafting method to use to decorate them...(with paint or mod podge as the primary options)
I finally decided to paint them.


I chose black paint to coordinate with the other black decorative accent pieces around my home...
which also allows me to be "non-committal" on my color scheme selection for Valentine's Day.
(we all know this time next year I'll be wanting something different).
With the letters being black, I can now add whatever accent color I want through the use of various ribbon.

red gingham ribbon for a "classic" Valentine's feel...

very cute. and very simple.

The fun doesn't end there folks...we're just getting started.
Here's where the REAL creative ingenuity comes into play...

I wouldn't consider myself a frugal person...
BUT with that said...
I am always very conscientious as to whether or not a purchase will offer a variety of uses.
So it was bothering me that I was going to spend time painting these letters...
display them for Valentine's Day and then box them up until next year.

That's when this came to mind...


By printing out a variety of "accent" words...
I could do any of the following options for Valentine's Day...


or swap out the ribbon color to pink and white polka dots & add it to only one letter for a different look.


see how it's just tucked up underneath the ribbon - easy!


AND HERE'S the BRILLIANT PART!!!

change up the ribbon color and accent word to reflect the current season...

like this one for SUMMER...  "

or this one for Halloween?

a play on words from the phrase "a fool for love"...*wink*
LOVE this whole concept!!!


There are SO many different things you can do with this one word to personalize it for your home...

This one has a special place in my heart because our big thing with Ella right now is asking her...
"Guess what?"  and she responds "Love You!" Sooo...cute.
(Actually, Ella is now running up to us asking "Guess what?"...and then she responds for us with a resounding "Love You"!)

I kept the concept REALLY simple but feel free to get as creative as you like...
• paint it whatever neutral color you prefer to match your home decor (white, black, vintage blue, etc.)
• wrap the letters with any type of ribbon, fabric, scrapbook paper or just leave it plain
• add any word or a combination of words to make an entire phrase/sentence.
• make the "accent words" fancy by backing them with colored cardstock or turning them into cute tags to hang from your wooden letters.

and guess what...
you can use this same concept using a DIFFERENT word to display in your home year-round...
like "FAMILY"?!

I hope you are inspired.
This is SUCH an easy craft project that will be worth every bit of your time.
And because I ADORE you to pieces...


I created an entire 2 page .pdf of "LOVE" letter accent words
for each month of the year...just for YOU!!! (your version won't have the months written in) *wink*
FREE DOWNLOAD HERE
Print
Print


I'm in LOVE with this idea.
I hope you'll feel moved to try incorporating this into your own home decor.
You can even get your kids involved in the painting process...
Or have them come up with your own family words to print out...
You can even put someone in charge of changing out the word every month. *wink*

Tips/Suggetions:
I purchased my letters from JoAnn's - they finally have a new selection of letters to choose from.
• I painted my letters with black acrylic paint...spray painting is an option too and will probably be a faster method.
• I sealed my letters after painting with a light mist of "matte" finish acrylic sealer. (like this)
• Attach your accent words by tucking them into your ribbon, punching a hole and dangling them from your ribbon or using tape that won't leave residue behind.
• Because the letters don't "free stand" very well, I lean my letters slightly back against a surface and then nestle them close together to keep them balanced.

KEEPING IT REAL
I completely left out the month of January in the .pdf...oops.
I decided to use the acrylic spray sealer on my letters after realizing during the first 1/2 of the photo shoot that the black paint was showing tiny scratches, smudges and painting imperfections. (reference the "love deeply" photos above).
In fact, I added another coat of paint and THEN used the sealer. MUCH better results.

coming up...

Wednesday, February 2

Find out what this is all about in tomorrow's post...

wordstolivebycollage9650

Until then...
I'll just keep you guessing...
and anticipating! *wink*


KEEPING IT REAL
I'm buried in design work...
Wasn't even going to post today but just HAD to 
give you a sneak peek of what's coming tomorrow!

{my shoppe} Halloween Collection 2010

Thursday, September 30

Tomorrow is a new month...
And this means we are heading into a new season.
It's time to capitalize on the excitement of it all...don't you think?
I'm excited.
And if for some reason you aren't all that excited...
I want you to GET excited!!
I'm hoping my new Halloween Collection will do the TRICK...
because you are in for a real TREAT!!

• cupcake toppers •
collage
Look at the variation of cupcake toppers you can create with this new collection!
These AWESOME cupcakes are from Cupcake Delights in Mt. Dora - flavors are listed at the bottom of this post.


next up...
make it an "Eeeeeky Clean Halloween"
• bar soap wraps •
soapwraps6751
Add some holiday flair to your guest bath or children's bath
by cutting a couple of slits on the side of the cupcake toppers, string ribbon through the slits and tie to a bar of soap.
Notice the variations of wrapping, ribbon type & placement.

Ella is obviously mesmerized by this little spider...first the cupcakes...now the soaps! *wink*
soapwraps6752


• lunch box wraps •
sandwichwraps6760
Add a special sense of excitement to your little ones' lunch...
Wrapping their sandwich or adding a cupcake topper to their food items always makes lunch extra special!


• home decor wraps •
candles6772
Create decorative candles, glass jars, & so much more.
You can even make napkin rings with the collection or create paper chains.


Because this product offers so many different variations of "wrapping" to add pizzazz to your holidays...
I introduce to you:
collage
Here's a view of the two page collection you get when you place your order!


If you weren't geared up for the upcoming season - I hope you are now!!
I can't wait to see what you do with these products!
Be sure to check in tomorrow for a SWEET giveaway...

Sources:
(If you are local...you should consider picking yourself up some of these ghoulishly delicious
and boo-tiful cupcakes from Cupcake Delights)
flavors: (top to bottom, left to right)
Twice As Nice, Peanut Butter Creme, Mummified, Kahlua & Creme, Cookies & Cream, Hot Chocolate

happy first day of fall...

Thursday, September 23

it's the first day of fall.
the air is crisp and cool...
the faint smell of nutmeg, cloves & cinnamon is in the air...
i'm ready.
are you?

need a little inspiration to get you geared up for the upcoming holiday season?
does this do it for you?

needle-felted acorns
1needlefelting6461

go check it out.
it's a fun tutorial all about these adorable needle-felted acorns.
these would be the PERFECT addition to any fall dessert table.
they are relatively easy too!!!

make it a great thursday everyone!

KEEPING IT REAL
the guest blogging feature was perfect timing -
my week has been crazy-busy and who knows if i would've even been able to post something today!
this made it REALLY easy! *wink*
thanks Carrie!!!

{mini desserts} ice cream cone cupcake skewers

Wednesday, September 22

today is THE day.
the final day to submit your creative cupcake skewers to Courtney over at Pizzazzerie!
remember?

so.
because i'm just DYIN' to share with you my submissions...
BUT...
i'm keeping them a secret for now...
here's one that i created but did not submit for the contest but is still completely adorable!! (and super easy)

mini ice cream cone cupcake skewer
icecreamcone6670

what you'll need:
mini ice cream cones
cake recipe (a boxed version works too)
cream cheese frosting
red gumball
assorted sprinkles
"spice drop"

place mini cones upright in mini muffin baking pan.
fill mini cones barely 1/2 way with cake batter.
bake your cupcakes right in your ice cream cones for approx. 12 minutes.
remove from pan & let cool completely.
pipe on cream cheese frosting.
add assorted sprinkles & one red gum ball.
cut a sliver from the end of a "spice drop".
slide it onto your skewer as a base to keep the cone in place.
puncture a small hole into bottom of ice cream cone cupcake and rest on spice drop.
ta dah!!!

i hope this mini treat put a smile on your face!
i know i'll have a HUGE smile on mine if i happen to win this contest.
the prizes are FABULOUS!
my most treasured prize?

NEW book


SIGNED by my favorite creative cake-pop queen herself...Bakerella!
(did i mention she is also a JUDGE for the contest?...oh. my. goodness!)

and there are SOOOO many other wonderful prizes too!
keeping my fingers crossed.

KEEPING IT REAL
i may have to squeeze in a few more entries before the 5p.m. deadline tonight -
that would be in between a hair appointment, school project for clara this afternoon, doctor appointment & real life. uh....yeah.
wish me luck!

{clever} edible crayons

Tuesday, August 3

i'm gearing up for back-to-school
and i'm flipping out over these edible crayons!!


at first i thought these were taffy pieces...
nope.
pretzel rods + candy melts = SUPER EASY & SUPER ADORABLE!!
but wait...
you can get the FREE printable labels!
make a whole bunch of them and insert into a plastic pencil box for presentation or gift-giving.

i'm thinking:
back-to-school parties
teacher gifts
crayon themed birthday party
LOVE'em!

for the full post & details go to Gourmet Mom On-the-Go!
and thanks Simply Creative Insanity for the link in your "Back-to-School" Freebies!
(She's even included the adorable Teacher Thank You cards from my friend Kim!!)

KEEPING IT REAL
Hmmmm....how do I adapt these to accomodate my older girls who are both out of grade school?
Let's face it - they won't think it's the least bit cool to bring a teacher a gift in the first place, let alone show up to school with edible crayons. *wink*
Oh the things Ella has to look forward to when she starts school in a few years. (or is it really just ME that's looking forward to being able to do things like this again)?! Yeah. It's me.

sweet & simple...

Thursday, July 15


i've tried countless vessels to house my dish soap.
are you the same way?
seems like i'm always on the search for that "perfect" container.
let's face it.
the dishes HAVE to be done.
you may as well feel pretty while you're rolling up your sleeves...
am i right!?
it's got to be pretty AND functional.
i've done everything from olive oil cruets to syrup dispensers...
this weekend i spied this little gem in world market.
my first thought?
"NO metal components."
the metal parts on the previous dispensers i've tried end up rusting over time.
i figured this might just be the "closest to perfect" dispenser yet.
& heck....it was worth the try at only $2.99!
what do you think?
sweet & simple...
(i could also see some bubble bath in this too...it'd be SO pretty sitting next to the tub!)

i'd LOVE to hear about some of the creative things you've tried...please share!
here's to a really GOOD thursday for all of us!

Keeping It Real:
I said the newest soap dispenser was "closest to perfect"...
I have to use my finger to wipe the lip after pouring it.
But it still makes the dish washing process seem a little more posh...*wink*

- Working on a "thirsty thursday" post for next week...
- Getting ready to announce the follow-up challenge to the recent 343...(think "vegetables"...
that's all i'm saying!!)
- Writing an article for a magazine who recently contacted me - exciting!
- Considering participating in an invitation design contest - if you've got the goods, you should enter!!
- Had my girls create a "dream bedroom notebook" a couple of days ago - just cutting favorite pictures from magazines and pasting them onto paper - perfect for the "down time" during summer.

some fun for the fourth...

Monday, June 28

while i'm working on a "homemade lollipop" tutorial for you,
i thought i'd keep you busy by sharing a FREE 4th of July printable with you...


these "sparkler tags" are SUCH a super-easy way to personalize your 4th of July sparklers!
(i cannot take credit for the idea...it originated from this 4th of July digital package I purchased last year from my one of my FAVE digital designers: rhonna farrer).
i created my own in order to give you something EASY to make and get you in a festive mood...
your guests will appreciate the clever packaging when it's time to hand them out.

here they are assembled

and what could get better than an adorable sparkler tag?
well...
brace yourself...this is SO smart...

you can also use a circle punch to create these...

the circles can be added to any party element to add further cuteness to your holiday celebration!


for instance...i finally tried my hand at making these "jarfaits" posted by nesting newbies...

the labels fit perfectly on top for some added pizzazz!!
i used vanilla pudding, blueberries & strawberries
(i think using whipped cream, or vanilla ice cream would be WAY cuter - but the pudding is what i had on hand).

so there you have it.
you could really do so much with this FREE printable.
and couldn't you totally see the sparkler tag used at an evening wedding reception?!
(who knows...perhaps it's already been done?!)

i hope you all have a fantastic monday!
i'm looking forward to a productive week!

Keeping It Real
The circle punches were a complete afterthought...so I'm not as clever as you might think! *wink*
It just so happened, after finishing the design and printing them out, I realized they worked perfectly with a circle punch too...love it when things like that happen!
AND...the "jarfaits" were a last minute idea to add to this post. I whipped these out in less than TEN minutes people!! Seriously super easy. I can't wait to try different versions using angel food cake, pound cake, cookies...etc. Oh the possibilities!!

{tutorial} glass etching

Wednesday, June 23

so who's up for learning how to do some glass etching today?
don't worry...
it sounds SO much more intimidating than it actually is.
in fact...
it's SO easy and quick...
don't go crazy doing every glass object you come across...*wink*

I'm going to teach you how i created the personalized glass "milk bottles" I included in this party bucket
I used as party favors for the Lemonade and Sunshine Party I hosted for my girls.


here's what you'll need:
paint brush
plain cardstock
2" hole punch
scissors
glass object for etching
(i used Starbucks frappucino bottles after discovering this post from Celebrations At Home)

i found my etching cream at Michael's


here are the martha stewart stickers i picked up - also from Michael's
(these worked great because they were made of felt - I'll explain why later)


punch a hole with your decorative punch of choice & using the leftover "frame",
create a square "template" using scissors. apply adhesive to template & position as desired on your glass bottle.
next, apply your letter sticker of choice in the center of your "frame/template".
as seen above, on this first attempt i decided to use a square scallop punch and a sheet of notebook paper.
i figured the notebook paper would be easy to work with but after experimenting some more, I prefer to use either cardstock or leftover scrapbooking paper.


now you are ready to apply the glass etching cream.
using a paint brush, just carefully dab on the etching cream...
remembering that any part of the glass touched with the cream will result in a "cloudy" or "etched" finish.


now wait 60 seconds - as the instructions suggest
(the etching cream is thick enough to stand your glass bottle upright during the drying process without it running).


after the 60 seconds, rinse the entire area under running water until all of the etching cream has been washed away.
next, use your thumb to remove/scrape off the frame & any leftover adhesive and then carefully peel off the sticker for reuse. (the felt stickers from martha stewart worked perfectly and were thick enough to withstand the water as well as being peeled off - allowing for use again in the future).

here's the finished bottle...
(notice the imperfections in the scallop)

i then decided to try just a regular 2" circle punch to see if i could get a "cleaner" result

i also applied a lot more etching cream...

and here are the two bottles side-by-side
(the plain circle still had tiny imperfections)


i concluded that i needed a thicker cardstock and that i needed to make sure i was applying adhesive right up to the very edges of the template.
so i decided to try again - this time using a 2" scallop punch


after applying the adhesive, hold your template up to the light to unveil "glue hair".
(you want to remove these because they're the culprit of imperfections)
i found that by just taking my finger and lightly rubbing/patting the "hairs"
they disappeared quite easily.


i was much happier with the result...
and i also found the cardstock was easier to peel off vs. the notebook paper
AND the heavier amount of etching cream did NOT effect the outcome

now you have an adorable personalized glass bottle...
it makes for a GREAT gift.

tuck it into a favor bucket like i did for the recent party i hosted

OR
fill it with candy & give it as an individual gift/favor...
OR...
you can do what i'm going to do...
use these around your home to help identify everyone's drinks.
the possibilities are endless really...
change up your template for different looks...
there are plastic templates available in craft stores, specifically for glass etching.
spell out words or entire names instead of just using a single letter.
get creative...
i'm already thinking of doing an entire set of glasses with numbers - how cute would that be for entertaining?!

i hope you enjoyed the tutorial...
if you try it out, you'll have to come back and share!
happy wednesday everyone!

Keeping It Real
Although my original intentions were to have the girls use the starbucks "milk bottles" on the table to drink from during the party & then send them home as favors too...after I etched them, I just couldn't get past the fact that mason jars were much more appropriate for the "feel" I was trying to create. BUT, I had a hard time finding any mason jars that I could actually etch because they all have the "trademark" impressions all over them. I know it wouldn't have REALLY mattered in the end...but it was a detail I couldn't get past so I just used the milk bottles as part of the favor buckets. Silly.
CopyRight © | Theme Designed By Hello Manhattan