Blog Widget by LinkWithin

{invitations} tea for two...

Friday, July 30


two custom tea party invitation requests in the same week...
one is for a six year old birthday party...
the other is for a sixteen year old.
i used the same main digital elements i designed to create two different vibes...

i adore how they both turned out!!
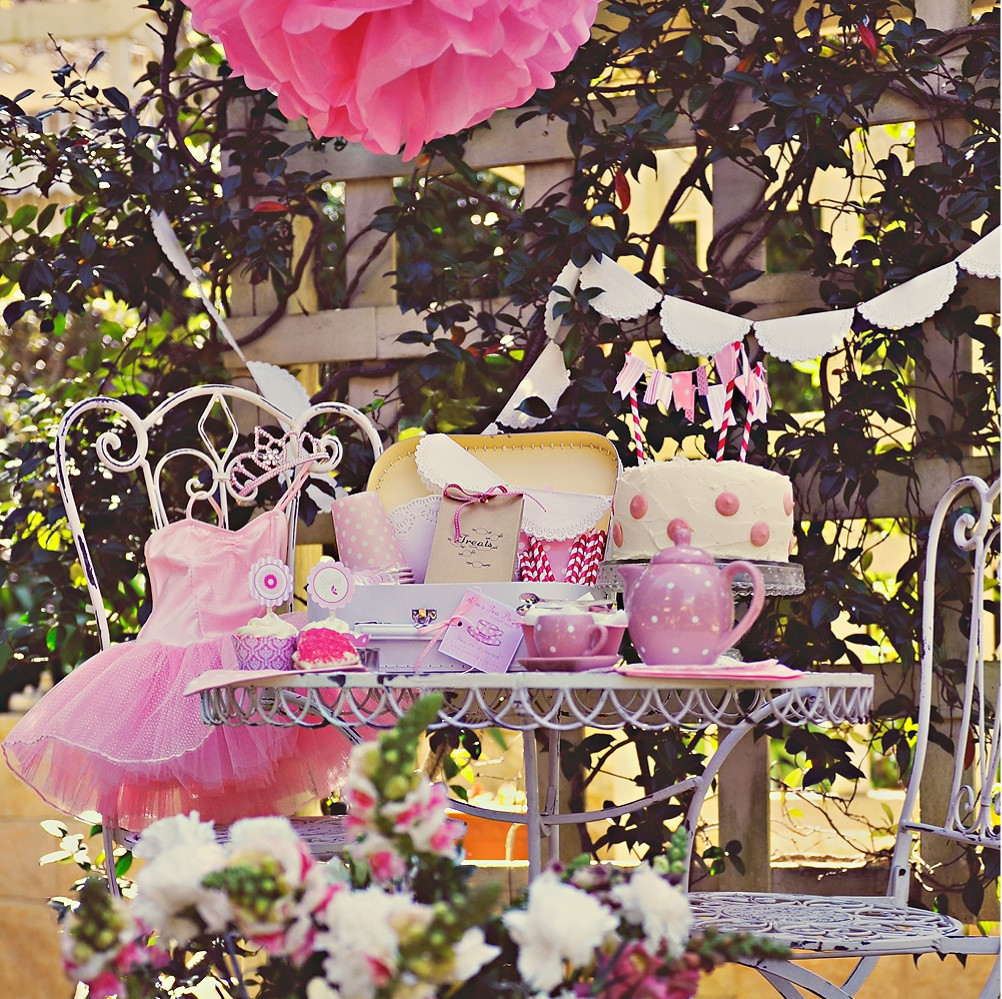
if you are wondering about the "treasure box tea" concept,
the mother has invited other mother & daughter's to attend a party honoring her sixteen year old daughter.
each guest is being asked to bring a sweet letter, photo and small trinket representing faith & virtue.
these items will be placed in the treasure box for kallie to "treasure" through the years. *sweet*
(I can't wait to get pictures back from both events...you hear me Heather & Aimee)? *wink*

i finished up the magazine article i was asked to write! (phew)...
boy was that nerve-wracking.
i'm such a perfectionist and of course kept second guessing the vibe of the article.
it's officially done and sent off.
i'm excited about sharing the details with you but will hold off for now.
(for whatever reason, i feel if i talk about it before it's published then i'll be jinxing myself - and then what if it never happens)!
i'm weird like that sometimes. *wink*

i've got some exciting projects i'm working on.
some are customer requests...
some involve some new party accessories i'm excited about...
others are just things around the house.
i'm also gearing up for a video tutorial to share with you.
been thinking about the video concept for awhile now.

i'm also full-focused on november.
not only is it ella's 2nd birthday...
but we are hosting thanksgiving at our house this year.
trying to decide if i should combine the two celebrations...
it would certainly be more budget friendly - wouldn't it?
i have some REALLY cute ideas going on in my head.
i've GOT to finalize the custom table we are having designed -
otherwise, we won't be sitting comfortably, enjoying that thanksgiving feast!

hope you all have a fantastic weekend!!

{thirsty thursday} diy projects

Thursday, July 29

"THIRSTY THURSDAY"

defined as a day to share something...ANYTHING... that makes my mouth water...
quenches my creative tastebuds...or satisfies my thirst for inspiration.

i'm on such a diy kick lately.
i have this especially strong craving to paint and create.
it seems every time i turn around i find another project i'd like to get my hands on?

here are just a few of the images i've come across lately that have been adding fuel to fire...


wedding escort card door display
although intended for use at a wedding, i LOVE this idea because i've been looking for an easy, creative way to display pictures of inspiration i come across. i could recreate this look with any of the old windows i already have.

painted vintage cupboard
{source: dreamywhites}
i've been itching to get the paint out and transform several of my pieces of furniture.
when i saw this...and the fact that the paint color is included at the bottom of the post...
well...it really got me itchin'!! (and i'll take everything in the cupboard too, please!)

did you happen to notice the recurring chicken wire theme in the doors?


vintage-looking wooden signs
{source: signs by diane}
i've already posted previously my desire to learn how to recreate these little gems...

remember these???
{source: mypaintedporch}
i've just GOT to try my hand at these - they're too beautiful to resist!
i've GOT to know how they create these without the use of vinyl!?
Do they print out the phrase and use that transfer paper and THEN paint and distress?
if you've got ideas or the know-how PLEASE share!!


bouquet garni
{source: heather bullard}
this french herb bouquet is traditionally used to prepare soups, stews and stocks.
it really inspires me to get to work on goal #14 - plant an herb garden
(but i' MUST have those scissors too...*wink*)

edible diy
these creations are absolutely adorable!
{source: bakerella}
i never cease to be amazed with the variety of cake pops bakerella comes up with!
these would be perfect for a "back-to-school" ice cream party...wouldn't they?

so many projects...
so little time.
i think i'll start on this one first...


this piece of iron work is something i "saved" from a neighbors trash pile.
go ahead...
laugh.
but it's a true story.
i was frantically driving out of the neighborhood one morning...
in fact, i was trying to get to clara's graduation on time.
we were running late.
my mind was spinning a million miles a minute.
clara was in the car with me.
all of a sudden i see it!
i slam on my brakes...(it sounds much more dramatic than it was - no squealing or anything)
jump out of the car...
inquire of the painter in front of the house if it's an item the owners are intending to get rid of...
he says "yes"...
i say "great! i'm taking it!"...
i throw it in the back of my vehicle like it's nobody's business...
jump back in and drive off - never having missed a beat! *wink*

i love the "chippy" feel of it...
but i've been wanting to paint it.
i think it's time.

any of YOU feeling the urge to take on some d.i.y. projects lately?
would love to know what you are working on!
and if you hadn't had the urge...
i hope this "thirsty thursday" post has inspired you!

{mini desserts} ice cream cookie pop

Wednesday, July 28

in my continuous search for mini desserts...
i was suddenly inspired this past weekend.
i was in the middle of making regular chocolate chip cookies...
when all of a sudden...
BAM!

mini ice cream cookie pop anyone?


aren't they adorable?!
i mean seriously!!
this is the perfect summer treat!
keep a stash of these tucked in the freezer for the kids...
(or yourself)...
and you've got a quick...
mini...
dessert bite!

the perfect blend of cookie and ice cream...


all on a convenient stick...


or no stick at all...

either way works.
just be sure to make plenty...
these "cool" little treats are going to fly like "hotcakes"...

WHAT YOU NEED:
chocolate chip cookie recipe (or use mine)
ice cream (i used what we already had - chocolate chip)
cookie sheet or jelly roll pan FOR THE ICE CREAM (must be able to fit in your freezer)
something with sides is GREAT to help achieve a nice edge
cookie sheet for the cookies
wax paper
1.5" round cookie cutter (or round cutter slightly smaller than the size of your baked mini cookies)
lollipop sticks

WHAT YOU DO:
take out ice cream from the freezer so it can start getting soft
line cookie sheet or jelly roll pan with wax paper (this is for the ice cream)
prepare chocolate chip cookie dough according to recipe...
BUT...replace regular chocolate chips with mini chocolate chips.
form teeny tiny dough balls with your hands & bake on a separate cookie sheet for 3-5 minutes shorter than your normal baking time.

when your first batch of cookies are done and cooling completely...
scoop out softened ice cream onto your prepared, wax paper-lined pan.
smooth out the ice cream with a rubber spatula.
the end result should be a flat 3/4" thick layer of ice cream
cover with wax paper and place in freezer.
continue baking the rest of your cookies.
once all cookies have cooled completely...
save yourself some time by pairing up mini cookies for the final process of "sandwiching" with ice cream.
remove prepared ice cream from freezer.
PREPARE TO WORK QUICKLY
cut a circle of ice cream with round cookie cutter...
remove from wax paper.
place on one mini cookie.
insert lollipop stick. (squish down just a bit)
sandwich together with 2nd cookie.
repeat with about 3-4 more cookies and then place those in the freezer. (i put mine into a gallon sized ziploc freezer bag).
continue to work until the ice cream becomes too soft.
replace ice cream in freezer until it's hardened back up.
repeat process until all cookies have been transformed! *wink*

happy wednesday everyone!
it's been a super busy week.
can't wait to share with you my latest projects.
looking forward to having a new dishwasher delivered today! *wink*


KEEPING IT REAL
notice i didn't suggest making these little mini ice cream cookie pops for your next dessert table?
these really are only sensible for grabbing out of the freezer and eating immediately.
if you are up for the challenge, by all means i won't discourage you.
but trust me.
they begin melting so fast I imagine it would be a disaster if you tried displaying them at your next dessert buffet.
don't believe me?
go back up and look at the very first photo.
notice the ice cream pop in the very back?
you can see the ice cream cookie has started to slide down the stick...
see the stick poking up through the top?
i could've left the photo off of the post...
but c'mon people...let's keep things real! *wink*

{inspiration} ava's tea party

Monday, July 26


(images from details! details!)


"beauty full" isn't it?
now before you go getting all excited about this beautiful tea party...
i must tell you.
it's unlike anything you've ever seen.
and that's because the story behind it is so touching.
it'll move you.
and that's my goal.
i hope it moves you enough to participate.
because you are invited...
we are ALL invited...


here is the vision behind ava's tea party taken straight from the site...


i'm so amazed when a family turns their grief into something beautiful we all can participate in...
what a warm, touching tribute to their sweet daughter.

i've already purchased an invitation through details! details! and plan on doing something simple.
something special.
definitely makes me want to hold & hug my own three daughters for an extra long time today...


for more details and information please go to: www.avasteaparty.com

a special thanks to sharnel dollar designs for leading me to this special tea party through your facebook fan page post...hugs!

it's the little things...

Friday, July 23

here's what i woke up to yesterday morning...


let me explain...

earlier in the evening j and i shared a conversation about
- the letter i'd found earlier in the day - a letter i wrote a couple of valentine's days back but never gave to him...
- his account of that same valentine's day when he found himself standing at the florist counter demanding to know why the flowers he'd ordered for me weeks ago still hadn't been delivered.
- how NOW the only time he gets flowers for me is if the grocery store rewards him with a free bouquet as part of their grand opening. (true story)
- the "now and then" of our relationship
- the challenges we both face in our day-to-day

well...
i was completely exhausted...
not feeling 100%...
and knew i'd be getting up at 4a.m.
so i went to bed early. (like eight o'clock early)!
while i was asleep...
j went outside in the dark...
ten o'clock at night...
clipped a yellow rose...
placed it in one of my favorite bud vases...
wrote me a little note filled with love and encouragement...
and put both on my desk where he knew i'd see it first thing.

the last line of his note?
"Yes, it's another "free flower"...but I picked it at 10p.m."
how sweet is that?
what a wonderful way to start my day.
and i'll take those kind of "free flowers" all day long!!

i share this with you because it's the little things that make all the difference.
as women...you know exactly what i'm talking about.
this little gesture of his sparked in me the desire to do something sweet for him.
and that's what it's all about...isn't it?

Have a fantastic weekend everyone!

KEEPING IT REAL
Ella actually found the note. She'd gotten a book out of my office and was carrying it around. The letter slipped out and there I was - transported back-in-time a couple of years. It doesn't get any more real than that! *wink*


No...I didn't forget about "thirsty thursday" - still compiling some fabulous things to share and it's been a busy week!

Am I ever going to post the new challenge? Yes. I'm gearing myself up for it. It's going to take some dedication and I need to be on point. I'm also doing a little research that I'm going to need to include. Don't you love the suspense? Just gear yourself up next week. I'll be announcing it early in the week so the challenge can begin on Monday, August 2nd!!

{STYLING} rice krispy treats

Wednesday, July 21


i was asked to bring rice krispy treats to a gathering of friends this past weekend.
i was specifically asked to bring THESE...

recipe & photo from twig & thistle
super cute...right!?


well...
i made a regular version of rice krispy treats with NO lollipop stick - for the gentler crowd.
and then i went with a peanut butter and chocolate version...


instead of dipping the bottoms into the chocolate like twig & thistle's version...
i decided to sandwich two rice krispies together so that the chocolate wouldn't actually touch the tray/plate they were going to be displayed on.
less mess is always better, right?

then i added more chocolate drizzle to the top...
some decorative paper to the tray...
& a coordinating flag to the lollipop stick.
VERY cute presentation don't you think?
pretty sophisticated for rice krispy treats! *wink*

well...
i got to thinking.
this is SUCH an easy dessert ANYONE can make.
why not experiment with some additional...
SUPER EASY ways to help doll them up.
so i thrust myself into the throngs of what i call the
"rice krispy treat fancification experiment"!

using the exact same rice krispy treat...
some different colored ribbon....
a couple of other unexpected elements...
and you've got yourself a plethora of styling ideas...


here are some simple "pink" accents using curling ribbon & tulle
think little girl birthday party, baby or bridal shower and how about a "circus" or "vintage" themed event??


what about pink & black...or pink & green WITH or WITHOUT the striped lollipop stick?
see how adjusting the height of the ribbon changes the look as well...


a brown & pink polka dot combo is super cute too...
BUT...my FAVORITES ended up being these with the gingham ribbon...
again, sliding the ribbon up or down makes for a completely different look...


how about some funky curly ribbon variations...
just changing the color of ribbon, the amount used & placement on the plain or striped
lollipop stick gives such dramatic results...don't you agree?


here's where i take things to an entirely new level...
step back for a minute...


flowers anyone? perfect for that garden tea party you are hosting...*wink*
i just removed the middle insert of the flower on the first example - punched a slightly wider hole with my "crop-a-dile II" and slid it right onto the stick. perfect fit.
the other two examples are flowers with wire in the stems...
flower up...or flower down??


i couldn't DARE go without experimenting using the ever-so-popular
printable cupcake toppers...
(these "celebration circles" are part of my "Caitlyn Cupcake Collection" found in my shoppe).
tulle on the top or tulle on the bottom?


and here's a random styling idea...
totally makes me WANT to have a raffle at my next party!!
think carnival/circus party or a raffle at your next bake sale...clever!


you get my point by now...
presentation is everything...
but it doesn't have to be complicated.
AND...
neither does your dessert! *wink*
remember that for your next party!!

KEEPING IT REAL
Wanna hear something SO funny?
This "photo shoot" was done 3 days after I made them.
Needless to say the chocolate lacked that "fresh" look.
It needed some "just dipped shine".
I grabbed the olive oil, dabbed some on my finger & rubbed the chocolate to spruce it up.
It worked like a charm.
Anything for a photo shoot, right?
shhhh...don't tell. *wink*

{real parties} ICE CREAM in the garden PARTY - Emily Piper

Tuesday, July 20

think birthday.
summer.
ice cream.
garden.
clay pots.
flowers.
tutus.
mix'em all together...
and serve yourself up an adorable
"Ice Cream Garden Party"...


it all began when Emily from Tiny Belles Boutique contacted me about designing an invite for her daughter's upcoming birthday party...

i knew it'd be an ice cream party...
it'd be in her mother's beautiful backyard garden...
& she'd be incorporating the TomKat Studios Ice Cream printables! (the invite needed to match)
it was from there i dreamed up an invitation with a cute tree & dangling ice cream cones!!
i'm SO thrilled Emily incorporated the design element from the invite into the party...
take a look:

ice cream cones dangling from a tree...

need a closer look? i mean HOW adorable are these!!??

i LOVE that Emily used mini sized tissue poms to recreate the ice cream cones. SO clever!!
(tissue pom tutorial here - just add the cone)


and don't the party printables from the TomKat Studio match perfectly??

i even like how Emily skipped the step of attaching the lollipop stick...
inserting it right into the cupcake icing saves time & money!!
(to avoid the tag from soiling, insert JUST before serving or sending home with guests.)


her use of clay pots for serving the ice cream toppings was the PERFECT choice to keep with the "garden" theme.
love the banner she attached to the potting bench too!


and my favorite picture from the party?
Emily's adorable daughter, all dressed up in a beautiful tutu...pink flower petals at her feet and a smile indicative of a VERY satisfied birthday girl!!

great job Emily...
i love what you did with the party theme -
now i'm going to have to host an ice cream party of my own -
just so i can steal your brilliant idea of the tissue pom ice cream cones *wink*
For more pictures & details, take a peek at Emily's blog!

i hope everyone else is inspired to host their own ice cream party now!!

party sources:
party printables: tomkat studio
rosette tank top: modern frills
photography: stillpoint
CopyRight © | Theme Designed By Hello Manhattan