Blog Widget by LinkWithin

LET'S TALK TUESDAY | No. 8 :: Party Inspiration + Ideas

Tuesday, March 8


Very excited to be meeting up with a friend today for lunch...
but equally excited to be spending a few minutes this morning with YOU for our weekly "Let's Talk Tuesday".

By the way - you all are blowing me away with your fun questions! I hope you are getting as much out of our "LTT" meet-ups as I am!!

Q: I've been following your blog for what seems like forever and your party ideas are always so clever. They always seem to be "on trend" while always being a little different from the masses. I'm curious about your process for coming up with ideas. I like to plan parties for my kids and I will help on occasion with a baby shower when family or friends ask. It's coming up with the party theme that always has me a little stumped in the beginning. Of course Pinterest is always a great source of inspiration. Is that the same for you? Or do you have a specific approach for figuring it all out? Thanks Jessica. Loving your LTT posts and thankful to have you take time to answer my question. Nancy B.

A: This question really made me think. First of all, this may or may not work for some of you, but I stay away from Pinterest when I'm formulating my ideas for a party because I don't want to be influenced by what's already out there. I really try to create unique party ideas and if the concept isn't new, I at least try to make it my own. That being said, once my theme has been picked and I've got a basic concept and direction, THEN I'll head on over to Pinterest for inspiration.

Funny piece of trivia:  Pinterest didn't even exist when I first started party planning for my kiddos and it wasn't around when I started my blog seven years ago either. *laughing*

Anyway, I'd first have to say that my brain operates from a "theme" perspective - if that even makes sense. I have always felt the most "creative" when I first have a firm foundation or theme to jumpstart from. This applies to organizing a women's luncheon or dinner, decorating my children's rooms, designing a church cookbook, creating a Valentine's Day classroom exchange idea, and of course...hosting and styling a party. Give me a solid theme and that's when my creative ideas kick into high gear! 

Arriving at said theme can come from a number of things:
1. favorite things of the person being celebrated.
2. Pantone's color of the year and seasonal palettes.
3. Cute new party accessories I'd like to use/try.
4. the season in which the party is being held.
5. specific requests from the person being honored.

Let me give you a few specific examples of how the process unfolded for a few of the parties I've hosted over the years...I think this will be the most helpful way to explain my process.

LEMONADE AND SUNSHINE  PARTY
When I hosted the "Lemonade and Sunshine" themed double birthday for Clara and Emalyn SIX YEARS AGO, they were both celebrating milestone birthdays. Clara was crossing over into "teen hood" as she was turning thirteen and Ema was turning double digits for the first time with her tenth birthday.


Clara was smack dab in the middle of adolescence and she was getting really good at giving me attitude about anything and everything and she did NOT want a party. On the other hand, Emalyn was kind of caught in the middle.  She was being heavily influenced listening to her older sister gripe about a birthday party and yet I know she was quietly excited at the thought of getting to celebrate with her older sister...whom she idolized.  (and still does to this day, by the way). *wink*

So, needless to say, I had a little bit of "sweet and sour" going on in our house at the time.  The "Lemonade" portion of the party theme was born out of wanting to represent Clara and her mix of emotions as a brand new teenager, and "Sunshine" was the epitome of everything Ema was as she approached her tenth birthday...a girl with a sweet spirit, big heart and wonderful sense of humor. *grin* Combine the two and you've got a great mix and a darling party theme. Besides that, the theme also allowed me to create something that felt a little more "fancy and grown up" for Clara while still having a whimsical feel for Ema.

CLASSIC RED BALL BIRTHDAY
When I started planning Ella's 2nd birthday, I just went down the list of the things she was excited about at the time. At the top of that list was her infatuation with inflatable balls. Each time we'd be at a store, she immediately gravitated towards those big ball cages that held all of the play balls. She absolutely LOVED them. 


I went with the classic red ball instead of a beach ball theme because Ella has a Fall birthday. Inflatable balls...let alone beach balls...were not easy to come by. Besides that, I liked the simplicity of the color scheme and it made for an adorable invitation and even more adorable dessert table selections! *wink*


BUBBLES BABY SHOWER :: SHE'S ABOUT TO POP
SIX YEARS AGO,  (man time flies), I was approached by a friend who was hosting a baby shower for one of her best friends. She'd already decided she wanted to do a "She's About to Pop" theme and although it was a new-to-me theme at the time, I quickly realized as I began researching, the concept wasn't really all that new. I really like to try to make my party themes original. So, my challenge became to find a way to make this party stand out and be something that hadn't been done before. 


That's when I came up with the idea of making "bubbles" the focus instead of the popular balloons, popcorn and bubble gum concepts I kept seeing everywhere. On top of that, the mom-to-be was very modern and on-trend so I immediately referenced the hot Pantone colors of the season at the time and built the party elements and details around those.

So there you go...just a few examples of the method to my madness with regards to party planning.
I hope you've been inspired and PLEASE...keep sending in your questions!! I love answering them.

By the way...you can find more details about each party mentioned today under the "My Work" tab at the top of the blog. (along with other party ideas and themes). 


RANDOM GIRL TALK
1. Super excited about this new book arriving tomorrow!
2. Newest song added to my playlist - and what Ella is considering using for her talent show music. 
3. Latest crushes on Instagram: Jessica Wasserman and Brittany York
4. My doctor recommended I look into a neti pot after my third visit to her last week. So, while looking at them at my local Health Basket, I left with THIS instead, on the recommendation of one of the employees there. I've been using it on myself as well as Ella since she caught a cold last week too. Anyone else use either? 
5. A friend of mine was telling me about how her sister has tried StitchFix and loves it! Anyone else use an online personal stylist? I'm seriously considering joining. There are a couple of other similar services: Keaton Row, Tog + Porter, Stylit, The Refinery and I'm certain there are more out there.  Here's a helpful article comparing StitchFix, Keaton Row and Tog + Porter - just in case you are interested. 

And if you've tried ANY of them - I'd love to know what you think.

xoxo my friends!!

KEEPiNG iT REAL
To this day, the Lemonade and Sunshine party that Clara absolutely wanted nothing to do with ended up being one of my most popular parties - and was even featured in a magazine publication all the way in Italy. 

press | Casa Chic Interior Design Magazine

Wednesday, June 22

Pinch Me!!!
It's official...
Pen N' Paperflowers is now international!!!

magazine1872

I'm beyond thrilled to finally share with you my latest magazine publication news.

I was contacted a couple of months ago by an interior design magazine publishing company from Rome...
Lotus Publishing.

They wanted to include my Lemonade & Sunshine party I hosted last June
in a special issue of Casa Chic focusing on the "Arte della Tavola". (Art of the Table)
I was completely flattered and jumped at the opportunity.

magazine1866

It wasn't until after I submitted my photos did I know the publication would be available throughout Europe...
Paris, Rome, Italy...oh my!!!

magazine1867

magazine1851

magazine1870

magazine1864

magazine1868

magazine1869

magazine1857

Thank you SO much Annarita from Lotus Publishing for including me in this beautiful issue!!
I feel so fortunate and I was so excited to receive my two official copies in the mail.
They are gorgeous...
I've been completely inspired by all of the other talented designers that are part of this special issue.

If you happen to be in Europe or have relatives that can pick you up a copy...
It's available on newsstands now!! *wink*
I seriously feel so completely honored.
One of my biggest dreams is to travel to Italy...(see this post)
At least some of my photos and design work made it there! *wink*
This is definitely going down as one of the highlights of my journey!!!

KEEPiNG iT REAL
Although I can't read a lick of the magazine - I can easily spot my name and website
and the other articles included are complete eye candy.
My neighbor friend is going to help me translate some of it! *wink*

{tutorial} homemade lollipops

Tuesday, June 29

let's make some of these together...


just follow along with me on this super-easy "homemade lollipop" tutorial.
now before we get started, here's my disclaimer:
- i'm no expert on this process.
- there may be BETTER ways to achieve the same outcome. (feel free to share them)
- but this is the process i experimented with & the results were great. *wink*


1. GATHER YOUR SUPPLIES:
cookie sheet (for placing the lollipop mold on when baking)
lollipop mold (i used THIS ONE from Bake It Pretty)
non-stick spray or vegetable oil (use this to wipe down your candy mold prior to use).
4" lollipop sticks (like these - available at any craft store)
ziploc bags (if your hard candy isn't individually packaged)
mallet or rolling pin (for crushing candy)
packaging supplies (small cellophane bags, ribbon or fabric - available at any craft store)


2. PREPARE CANDY FOR MELTING
since my candies were already individually packaged...
it was SUPER easy to just give each piece of candy
a couple of soft whacks with the mallet.
the candy doesn't have to be finely crushed...
just small enough chunks to fill the candy mold.
(if you use candy that's NOT individually packaged,
you could always put them in a ziploc bag and crush them all at the same time).

when your candy is all crushed...


3. POUR INTO CANDY MOLD
see how easy those individual packages make it for pouring?
use a spoon if you don't have cute individual packaging!!
VERY IMPORTANT!
(make sure the mold has been prepared
with a light application of non-stick cooking spray or something similar FIRST).


4. PILE HIGH & ADD LOLLIPOP STICK
be sure to pile on the candy nice and high and slide your lollipop stick into the middle.
(i've tried it two ways...adding the stick AFTER it melts and BEFORE...i think i prefer AFTER).


5. BAKE AT 300 DEGREES (place on cookie sheet first for easier handling)
This process takes approx. 3-7 minutes for candy to melt completely.
(Here's why I prefer adding the lollipop stick AFTER. The candy melts down and isn't really touching the stick anyway by the time you finish this first "melt down"?) Hmm?


6. ADD MORE CANDY
this helps to cover the stick and ensure it's secure when we're done -
what's a lollipop without a stick? right?! *wink*


7. BACK INTO OVEN (another 2-3 minutes or so)
MUCH better results...
I even push down on the lollipop stick - WATCH OUT...it's hot...
and rotate it a little JUST TO MAKE SURE it's snug in the melted candy.
(just another reason why i think i prefer adding the stick AFTER the melting has been completely done...those sticks get hot). *wink*


8. LET COOL COMPLETELY AND POP'EM OUT
"ta dah"!!! easy...right?!


9. PACKAGE'EM UP PRETTY
they're now ready to give out as favors or treats
OR you could keep them all to yourself...depending on how you feel that day! *smile*


and let me just say...
if you happen to be so overly excited to make these and you forget to spray your lollipop mold...

here's what you'll get:


BUT...all is not lost...
just put the pieces back in your candy mold...

just like I did...
reheat and you are "good-to-go"!


i hope you enjoyed the tutorial.
if you have any questions or need clarification on anything...let me know.
and if you try this out...i'd LOVE to see the results.

have a fantastic Tuesday!

KEEPING IT REAL:
On my first attempt at making these, I didn't KNOW to use a non-stick cooking spray (frustrated)
AND so...i threw my ruined lollipops & perfectly wasted lollipop sticks into the trash! (not good)
On my 2nd attempt, I knew to use the non-stick spray but was so overzealous with excitement to try again, I completely forgot to add it. (just plain silliness)
BUT...that's when it dawned on me I didn't have to throw the lollipops away...
By remelting them...I was back in business!! brilliant & beaming! *wink*

{recipes} lemonade cake, cookies & icing

Thursday, June 24

good morning...
i've had SUCH an amazing response to the recent party i hosted...
i just wanted to say thank you to all of the readers who've taken the time to leave comments.
i mentioned the comments are like little gifts i love opening...and they are.
so i wanted to give everyone else a gift too!

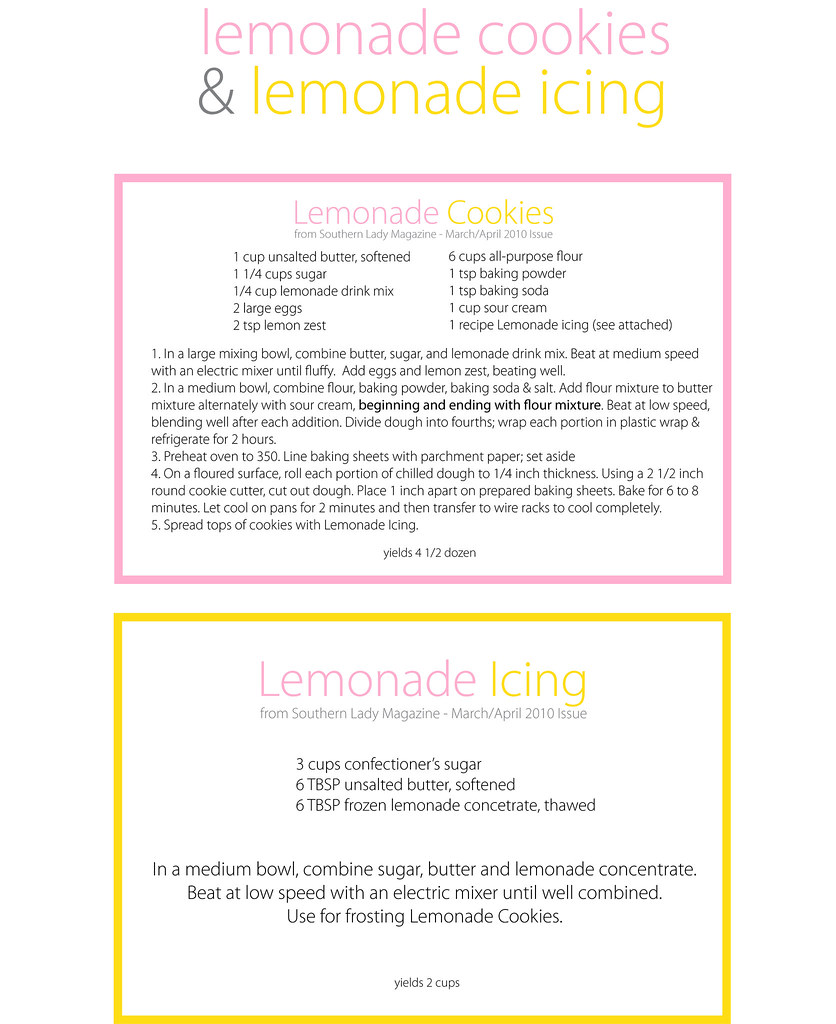
there have been many inquiries about the recipes from the party...
specifically the cake & cookies.
i decided to create little recipe cards and share them with you.

let me reiterate...
the CAKE...


it was absolutely fabulous - i substituted a lemon cream cheese frosting from my baking addiction. i received comments at the party - both from kids AND adults - it was the best cake they'd ever eaten! WOW!


UPDATED: many have inquired about the type of drink mix I used in the cake. It was pink powdered Country Time Lemonade.


the COOKIES...


not so much.
i felt like they were a lot of work and they weren't all that impressive.
BUT...the icing was VERY yummy. (i DID add food coloring to achieve pink & yellow)
you could always use your favorite sugar cookie recipe and then add this delicious frosting?
(here's MY favorite sugar cookies recipe if you don't have one of your own...)
the cookies were NOT meant to be "sandwich" cookies either...
which may have been the problem...too much cookie & not enough icing?
since i wasn't sure if the icing would harden up enough to actually stack them without making a mess...
i sandwiched them together for ease of displaying them.
AND i saved myself some time by only having to frost 1/2 the batch! *wink*
this recipe makes A LOT of cookies - you could completely cut the recipe in 1/2.
SO...despite not LOVING the cookies...
i decided to share the recipe ANYWAY since so many of you have asked.
and who knows...
perhaps you'll come up with better results?


i hope you enjoy the free recipe cards as much as i've enjoyed reading all of your wonderful comments!

have a super thursday - hugs to everyone!

Keeping It Real
For those of you who are tired of hearing about the lemonade & sunshine party...
and are missing the "thirsty thursday" posts...
i've got one in the works already for next week...*wink*

{tutorial} glass etching

Wednesday, June 23

so who's up for learning how to do some glass etching today?
don't worry...
it sounds SO much more intimidating than it actually is.
in fact...
it's SO easy and quick...
don't go crazy doing every glass object you come across...*wink*

I'm going to teach you how i created the personalized glass "milk bottles" I included in this party bucket
I used as party favors for the Lemonade and Sunshine Party I hosted for my girls.


here's what you'll need:
paint brush
plain cardstock
2" hole punch
scissors
glass object for etching
(i used Starbucks frappucino bottles after discovering this post from Celebrations At Home)

i found my etching cream at Michael's


here are the martha stewart stickers i picked up - also from Michael's
(these worked great because they were made of felt - I'll explain why later)


punch a hole with your decorative punch of choice & using the leftover "frame",
create a square "template" using scissors. apply adhesive to template & position as desired on your glass bottle.
next, apply your letter sticker of choice in the center of your "frame/template".
as seen above, on this first attempt i decided to use a square scallop punch and a sheet of notebook paper.
i figured the notebook paper would be easy to work with but after experimenting some more, I prefer to use either cardstock or leftover scrapbooking paper.


now you are ready to apply the glass etching cream.
using a paint brush, just carefully dab on the etching cream...
remembering that any part of the glass touched with the cream will result in a "cloudy" or "etched" finish.


now wait 60 seconds - as the instructions suggest
(the etching cream is thick enough to stand your glass bottle upright during the drying process without it running).


after the 60 seconds, rinse the entire area under running water until all of the etching cream has been washed away.
next, use your thumb to remove/scrape off the frame & any leftover adhesive and then carefully peel off the sticker for reuse. (the felt stickers from martha stewart worked perfectly and were thick enough to withstand the water as well as being peeled off - allowing for use again in the future).

here's the finished bottle...
(notice the imperfections in the scallop)

i then decided to try just a regular 2" circle punch to see if i could get a "cleaner" result

i also applied a lot more etching cream...

and here are the two bottles side-by-side
(the plain circle still had tiny imperfections)


i concluded that i needed a thicker cardstock and that i needed to make sure i was applying adhesive right up to the very edges of the template.
so i decided to try again - this time using a 2" scallop punch


after applying the adhesive, hold your template up to the light to unveil "glue hair".
(you want to remove these because they're the culprit of imperfections)
i found that by just taking my finger and lightly rubbing/patting the "hairs"
they disappeared quite easily.


i was much happier with the result...
and i also found the cardstock was easier to peel off vs. the notebook paper
AND the heavier amount of etching cream did NOT effect the outcome

now you have an adorable personalized glass bottle...
it makes for a GREAT gift.

tuck it into a favor bucket like i did for the recent party i hosted

OR
fill it with candy & give it as an individual gift/favor...
OR...
you can do what i'm going to do...
use these around your home to help identify everyone's drinks.
the possibilities are endless really...
change up your template for different looks...
there are plastic templates available in craft stores, specifically for glass etching.
spell out words or entire names instead of just using a single letter.
get creative...
i'm already thinking of doing an entire set of glasses with numbers - how cute would that be for entertaining?!

i hope you enjoyed the tutorial...
if you try it out, you'll have to come back and share!
happy wednesday everyone!

Keeping It Real
Although my original intentions were to have the girls use the starbucks "milk bottles" on the table to drink from during the party & then send them home as favors too...after I etched them, I just couldn't get past the fact that mason jars were much more appropriate for the "feel" I was trying to create. BUT, I had a hard time finding any mason jars that I could actually etch because they all have the "trademark" impressions all over them. I know it wouldn't have REALLY mattered in the end...but it was a detail I couldn't get past so I just used the milk bottles as part of the favor buckets. Silly.

{lemonade & sunshine party} preparations part III

Thursday, June 17


no real time for chatting today...
only 2 precious days left for party preps!

wanted to give you a peek at what i'm working on -
these are only clues...
no details for now.
don't you love the suspense?


hope your thursday turns out to be filled with sunshine!

KEEPING IT REAL
REALLY enjoying the process of this party...
starting to feel a little pressure though to finalize some things.
keeping fingers crossed that on saturday it doesn't rain...
that it's not TOO unbearably hot...
AND...
that the property owner right behind our house...
the one that owns the piece of property i've staked out for the party location...
well...i hope he doesn't decide to randomly drive by & boot us off. yikes!
perhaps offering him a refreshing jar of lemonade with a slice of pink lemonade cake will make everything ok? *wink*

{lemonade & sunshine party} preparations part I

Friday, May 28


the lemonade & sunshine party preparations are officially underway.
i emailed the invites yesterday.
party is scheduled for saturday, june 12th.
so...
let me share with you what i've been collecting!!
but let's make a game out of it...
because things are not always what they seem. *wink*
besides...this is where all of the magic starts...

do you see what i see?


look closely...


don't focus so much on the packaging...

close your eyes to the actual product inside...


are you seeing it yet?


have you figured it out?


how about a tee-tiny hint?

do you know what i'm up to?
i can tell you i'll be busy this weekend...
doing "stuff"...*wink*
maybe you should look forward to a "before & after" post on monday *hint...hint*


hoping you all have a happy holiday weekend...
HAPPY MEMORIAL DAY!!
CopyRight © | Theme Designed By Hello Manhattan