Blog Widget by LinkWithin

FUN | Spooking Season

Saturday, October 13


It's Phantom Pumpkin Season! Ella and I are on top of our game this year and we've actually already started our annual family tradition of "spooking" unsuspecting neighbors by leaving treats and surprises at their doorsteps.

This year I did something a little different for the homes with kids. I created a printable Halloween Bingo game and left a bag of black, orange and white Hershey kisses for the game pieces. So fun! And PS - you can use these adorable assorted kisses instead which are incredibly adorable too - check out images 4 + 5...look familiar? *wink*


These would be so fun for a Halloween party or how about a fall CLASS party too!!
I actually designed the bingo game using a combination of images I had previously designed for various projects so it was fun mixing them all together to create something new.


Of course there are some neighbors who are empty-nesters so we kept things sweet and simple by leaving cute treat bags behind. I mean look at how frightfully adorable they turned out! (below)


Again, using an idea I came up with while doing some work for Hershey's I decided to turn the creations into these printable jack-o-lantern, ghost, and spooky cat faces available as free printables for YOU. (see what I did for Hershey here - images 2, 3, 4, 5 + 6)


All you need is a cellophane bag, the color foiled kisses of your choice (black, white or orange) and a twisty tie. (or a cute ribbon as shown on the spooky cat). Print your faces, cut them out and stick them on with double-stick tape. Done!

I think the spooky cat is my favorite. *wink*
And not just because it's got the cute orange ribbon.


I hope this inspires you to get out there and spook some of your own neighbors and friends or if anything, create some adorable halloween treats! 

I know if you and I were neighbors...I'd certainly be spooking you my friends.

love you guys!
xoxo,
Jess

KEEPiNG iT REAL
It was just Ella and I this year.
And we broke tradition and did it during daylight hours instead of after the sun went down.
I was the getaway driver and she was the runner.
We made 5 deliveries on our first round of spooking.
Unfortunately, when we tried to finish the 2nd round of spooking a couple of days later,
Ella rolled her ankle as she was running back to the car. *tears*
Needless to say we called it a night.
With Ella back to 100% we have 4 more spooks left to do.

DOWNLOAD THE FREE PRINTABLES


HALFWAY HOMEMADE | Halloween Monster Cookies

Tuesday, September 25


*Affiliate links are included in just about every blog post I share here on Pen + Paper Flowers.
 These links allow me to easily share with you the same or similar items and tools I use for recipes, crafts or projects. 
These links also provide me with a small commission should you decide to click on them and purchase something. 
The commissions, collectively, allow me to continue sharing ideas and content with you.
Thank you in advance for your ongoing support of my blog and small business.  xoxo, Jess

You know I love baking from scratch.
I also love to save time in a pinch when necessary.
Combine the two and you've got something I call "Halfway Homemade" or "Pretty in a Pinch".

I've used this technique many times throughout the years to create delicious things to eat by combining something store-bought with something homemade. (ex. Salted Caramel Mini Apple Pies, or these Chocolate Peanut Butter Mini Oreo Pies, and this Pretty In a Pinch Cake).

It's kind of the same thing as buying pre-packaged pastries or baked items and then making them feel homemade by removing them from their bulky, plastic packaging and placing them in a cute basket lined with a pretty linen napkin. If you're going to a potluck adding a handwritten label to identify the baked goods adds even more charm. I've done this plenty of times.


So...today's example of Halfway Homemade are these monster-sized cookies which I appropriately named "Wickedly Delicious Monster Cookies".

You are essentially taking chocolate chip cookies and elevating them to an entirely new level. They are comprised of store-bought chocolate chip cookies, store-bought frosting in the middle, one side dipped in melted chocolate and sprinkled with crushed cookies. Wicked good my friends.


The finished product looks impressively homemade or even like something you'd find in a made-from-scratch bakery. I love that.

The idea behind these cookies is to gift them during the Halloween season. So I'm also sharing how to package them up to make them frightfully cute too - including the FREE Wickedly Delicious Monster Cookie Tags I made. I used these for our Phantom Pumpkin night but these are also perfect as sweet treats for teachers, co-workers, and friends too.

I shared this idea about 5 years ago and thought I should update the post to include even more straight-forward instructions and additional ideas for simplifying the process. (for instance, substituting the homemade buttercream with store-bought).

So let's get going...


SUPPLIES NEEDED (makes 5 monster cookies)

The Cookies
12 - oversized chocolate chips cookies from the bakery section of your grocery store
       2 for every cookie you want to make PLUS 2 or 3 cookies crumbled
Buttercream frosting from the bakery section of your grocery store
       they sell it already mixed up in tubs - one tub should be enough
1 - 12oz. bag of chocolate chips for melting + dipping - semi sweet or milk chocolate
Wax Paper to cover your work area and cookie sheet PLUS for wrapping finished cookies.
Cookie sheet for transporting cookies to and from freezer
                     make sure it'll actually fit inside your freezer first.

The Packaging
These items can be found at your local craft store but I've included some Amazon links here for those of you who prefer online shopping.

Striped black and white bags
Wax Paper or Parchment paper for wrapping cookies
Ribbon for finishing
Wickedly Delicious Monster Cookie Tags

INSTRUCTIONS
Cover cookie sheet with wax paper.
Arrange 6 cookies bottom-side up
Spread on buttercream frosting on all 6 cookies - enough so it will show after being sandwiched.
Top each cookie with another cookie.
Freeze for 10-30 minutes.

Melt chocolate chips using double boiler or microwave
Dip one side of frozen cookie into melted chocolate.
Place dipped cookie on wax paper and top with cookie crumbles.
Cool until set - approximately 30 minutes.

Wrap set cookies in parchment paper - secure with tape or twine if necessary.
Slip wrapped cookie into favor bag and fold to close. - tape if you'd like.
Wrap with ribbon.
Print + cut Wickedly Delicious Monster Cookie tags
Tape to bag as a finishing touch.
Done!


I hope these simplified instructions inspire you to try them out this year - if you haven't already.
Halloween is right around the corner...let's get freaky my friends!

xoxo,
Jess

KEEPiNG iT REAL
I thought I coined the term "Halfway Homemade" but then googled it.
There's a cookbook called Halfway Homemade. *eyeroll*
BUT I do have to say most of the things I'm seeing are from 2017, 2018 - sooo...since I used it back in 2013 should I still get the credit? *giggling*

PS - Not a lick of Halloween or fall decor out yet.
Wrapping up a Christmas project for Hershey and THEN the decorating will begin!!
Oh! And Ella wants to be a "goddess" for Halloween this year. I'd better start figuring that out.
Except she has me all pre-occupied with her double-digits birthday party coming up in November. *wink*

SHARE | Phantom Pumpkin 2017

Monday, October 23


Ella and I skipped town this past weekend so she could attend her bestie's "birthday weekend sleepover"! I even checked Ella out of school early on Friday afternoon so we could surprise Elise by being at her school when she got out of school. It was so fun! And she was soooo surprised.


Well...knowing I would be back home for a couple of days, I took the opportunity to make sure I continued the Phantom Pumpkin tradition I started so many years ago...even if it meant I'd be all by myself for the door-bell ditching. I spent Saturday afternoon with Ema and my mom creating the treats...."Mummy Oreos" and festive Halloween Hershey Kisses!

If you haven't already been "spooked" or done some spooking of your own...(or "booed" as some people call it), I wanted to share the FREE Phantom Pumpkin printables with you. You've got this whole week and weekend to have some family fun and spread some Halloween cheer! *wink*

PS - I've already changed two of the Hershey Kiss labels you see in the photo above. My mom said the "EEK" and "BOO" labels were too hard to read. I agreed her so I revised them and updated the printables for you already.

DOWNLOAD THE FREE PRINTABLES USING THE LINKS BELOW
FREE Phantom Pumpkin Printable
FREE Halloween Hershey Kisses Labels
and here's the craft punch you'll need for the Hershey's Kiss labels  <--- affiliate link

Enjoy my sweet friends...
Jess

KEEPiNG iT REAL
Ella, J and I did some spooking of our own in the new neighborhood prior to this weekend...AFTER we were surprised by some other fun neighbors who "booed" us. Hope they didn't mind that we stuck with our "Phantom Pumpkin" tradition instead of using the "booed" paper they left behind. *coveringeyes*

PS - J and I have been doing Whole30 for the past 23 days together. We've turned it into a friendly competition and I keep telling him I'm going to crush him. The first time we did it together (back in 2013),  I beat him by 1 pound...he lost 10 and I lost 11. BAM!! I'll keep you posted when we weigh in on the 31st...Halloween Day!! *wink*

CRAFT | Mini Monster Milk Jars + Cricut Explore®

Thursday, October 23


DISCLOSURE: This project is being considered for a prize from Cricut.

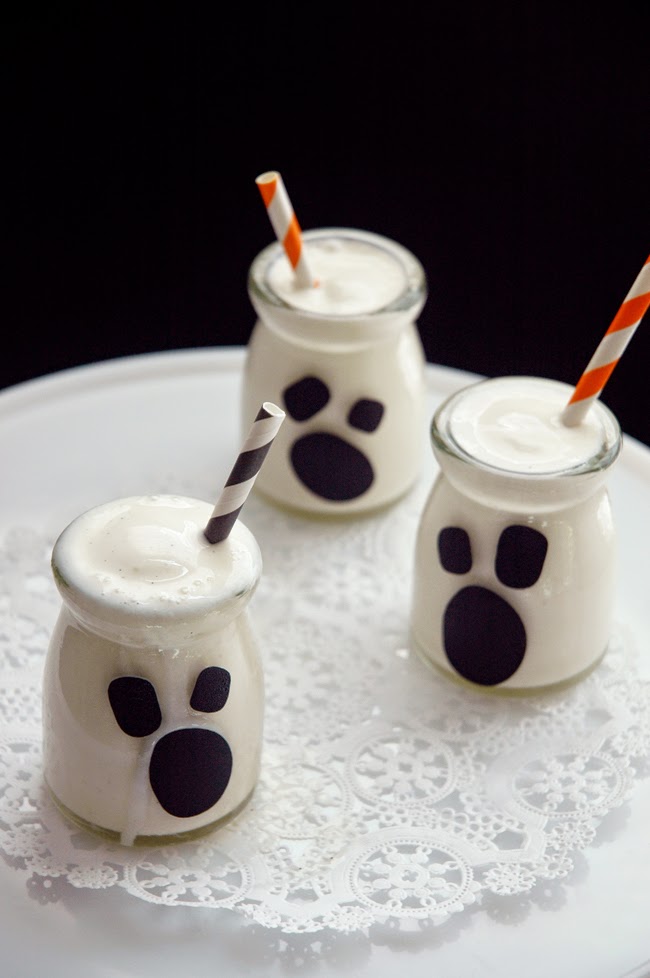
Are these not the cutest Mini Monster Milkshakes you've ever seen?
I'm in love with them!! The adorable bottles from The TomKat Studio are the perfect backdrop for creating these Mini Monster Milk Jars using your Cricut Explore® - or a pair of scissors…if you have the patience for the intricacies of the "Frankenstein" faces. *wink*


Yep! You guessed it. It's time for another Cricut Design Space Star Challenge.
My team and I chose a "Black and White" theme for our projects to go along with the pre-determined Cricut topic: Holiday Home Decor + Gift Ideas.

I thought these mini milk jars were perfect to share as they not only add some fun decor to your Halloween celebrations…but they'd make super cute favor jars filled with colored Sixlets® as well!! (these jars come with lids too - yes…yes they do!! - 4th picture from the bottom of the post).


What's surprising is that although all of these faces are unique…they were created from only two simple facial designs…a ghost face and a frankenstein face. I just mixed up the different elements (eyes, mouths) and even changed the size on a couple to create some real "monsterpieces". Ha! (I'm such a dork).

I think the Frankies are my faves!!

The bottles are filled with milkshakes…vanilla for the Ghosts and mint chocolate chip for the "Frankies". A little ice cream + splash of milk…blend it up and pour it in. You could also do healthy green smoothies for the Frankies too!!  And of course…don't forget to add a cute party straw. (cut a normal straw in two).

WHAT YOU MUST KNOW
Before I get started on the "How-To" for creating the monster faces…please know that you can make them using black vinyl OR white card stock. I made mine using black vinyl…BUT I wanted to experiment with the brand-new "Print the Cut" feature on the Cricut Explore® - which allows you to print an image onto your home printer first and then feed it into your Cricut Explore® for cutting! Yeah. Pretty freaking amazing.

So…the images you see here were cut from black vinyl but you could totally do it with card stock too. The card stock isn't moisture-resistant like the vinyl but would work just fine if the jars were filled with candies!

So…enough with the ghoulishness…let's get on with the how-to for making these fun Halloween treats.


SUPPLIES NEEDED
1 set of printable Mini Monster Milk Jar Bottle Faces - Pen N' Paper Flowers
1 set of 12 Mini Glass Jars - The TomKat Studio
1 Cricut Explore® Cutting Machine
12x12 Standard Cutting Mat
White Card Stock or Black Cricut® Vinyl

STEP ONE
Upload saved image to Cricut Design Space

STEP TWO - SELECT & DELETE
Use the "Select & Delete" option to erase the white background of the image.
Just click anywhere on the white background and it will disappear


STEP THREE - ERASE
Use the "Erase" tool to erase the black text on the image - push "Continue" when done.
Leave behind only the portions you want the machine to cut.

I figured out later I could've probably used the "Crop" feature (upper right) to select the images I wanted to cut instead of the "Erase" feature but hey…I'm still learning the ins and outs of the machine! *wink*

STEP FOUR - SAVE IMAGE
Save the image after naming it and adding tags in the boxes over to the right.


STEP FIVE - SIZE IMAGE
I made sure mine was about 8" wide (see below)


STEP SIX - PREP FOR PRINTING 
In the layers box, click on the tiny printer icon. 
This opens the pop-out window to the left showing the "print" feature.
***Skip this step if you are cutting from black vinyl and will not be printing***
Vinyl users can just push the "Go" button and load black vinyl into machine for cutting.


STEP SEVEN - PRINT & CUT
After you've printed your image using your personal printer, place your paper on your Cricut® Cutting Mat and follow the onscreen directions to load and cut your image. I used white card stock.

See those 3 L-shaped marks on the paper I printed? Those are a really important part of the Cricut Explore® "Print then Cut" feature. They are what the machine reads to ensure proper alignment before the cutting process begins. It's pretty cool…and amazing! See more photos below.


If you are using the new Print & Cut feature for the first time you will have to calibrate your Cricut Explore® machine first - the software walks you through the steps to do that. 
If you have ANY issues at all you can call Customer Support at 877-7CRICUT 


See that little beam of light shining onto the paper from underneath the cutting carriage? 
That's the machine reading the crop marks…prepping for cutting. It starts with the crop mark on the top left, moves over to the top right crop mark and scrolls down to the bottom left one. 
It's so cool to watch it in action!!

And now it's cutting…look at how precise the cuts are? 
Maybe you can't even tell what parts have already been cut because the cutting detail is amazing?

Here it is…all finished cutting. 
I peeled up the white card stock and left the black images stuck to the mat.

STEP EIGHT - MIX & MATCH
Mix and match the assortment of eyes and mouths to create a variety of faces.
Just by angling/tilting them a little differently makes a big difference in their appearances too!


For those of you who don't have a Cricut Explore® you can still print the FREE printable Mini Monster Milk Jar Bottle Faces onto a piece of card stock and then use a pair of handy scissors to cut them out. Use your favorite adhesive to stick them on.

Hope you love the project, friends!!
I'll be sharing the rest of the fun, creative things Team 14 came up with….soon!!


KEEPiNG iT REAL
I think I kept these in the freezer for a week before I was able to actually photograph them!
You'd never even know!! Ha!!

CopyRight © | Theme Designed By Hello Manhattan