It was Clara's 19th birthday last week.
Nineteen.
How is that even possible?
Has it already been a year since her
high school graduation party?
And she's now finishing up her first year of college? Stop it.
I could eat a whole cheesecake just thinking about the reality of it all.
In fact, I could likely eat
this whole cheesecake...
This delicious,
turtle cheesecake with a brownie crust bottom...
Clara's requested birthday dessert this year.
Honestly...there's no way I could really eat this all by myself because it is incredibly rich.
And trust me when I say I can usually put down some sweets in one sitting - no problem. *wink*
When Clara mentioned wanting this for her birthday dessert this year, I wasn't at all surprised. I mean this isn't the first time she's asked for a cheesecake. (
Clara's 15th Birthday +
Clara's 17th Birthday) I mentioned the other option of doing an oreo cookie crust vs. the brownie crust but she stuck to her guns.
It's her birthday afterall so there was no pushback from me on her final decision and I was honestly a bit intrigued by the fact that this was a "no bake" cheesecake. I'm used to my all-time family favorite cheesecake recipe in which the oven is required. So I was definitely curious.
Let me just say that
we are cheesecake snobs around here.
We are hardly ever satisfied or impressed by store-bought, restaurant-prepared or other homemade cheesecakes we've tried. I think we are just very picky because my mom's secret recipe has us spoiled and is seriously the best on the planet. I don't like or do "cakey" cheesecakes...
the ones that are fluffy. I prefer my cheesecakes to be creamy and rich and most of the time I prefer NOT having cherries or strawberries or any type of fruit on them.
Now chocolate...that's a different story.
And chocolate + pecans + caramel...with a Ghirardelli Brownie Crust...
Ummm...yeah.
Pretty ridiculous!
So here's the deal.
This cheesecake meets the "creamy and rich" standards and is absolutely delicious.
The fact that it's "no bake", (
aside from having to bake the brownie crust first), is an absolute bonus.
If you love cheesecake, caramel, pecans and brownies you should definitely make this
Brownie Bottom Turtle Cheesecake by Sprinkle Some Sugar. It's a winner!!
Brownie Bottom Turtle Cheesecake
inspired by
Sprinkle Some Sugar
Yield: 1 - 9" cheesecake, approx. 8-10 servings.
INGREDIENTS:
Brownie Layer
1 box brownie mix + ingredients listed on the box (
Ghirardelli Triple Fudge is what was suggested and is what I used and is what I will buy again for regular brownies - there are chocolate chip chunks in the batter...and it's nothing short of amazing).
Caramel Sauce
1 cup granulated sugar
1/4 cup water
3/4 cup heavy cream
3 tbs unsalted butter
1 tsp vanilla
pinch salt
Caramel Cheesecake
16 oz cream cheese, softened
1/2 cup granulated sugar
1/2 cup brown sugar
3/4 cup caramel sauce
1/2 tsp cinnamon (
I intentionally left this out - and no one missed it).
pinch nutmeg
4 oz cool whip
Toppings
chopped pecans (
I used approximately a 1/2 cup - if that)
caramel sauce
hot fudge sauce (I chose to make this
homemade hot fudge sauce - and it is YUMMY)
DIRECTIONS
Brownie Crust
Grease a
9" springform pan. Using a medium sized bowl, mix all brownie ingredients until smooth, and pour into prepared pan. Bake using the directions on the brownie box or whatever recipe you are following.
Caramel Sauce
While the brownie crust is baking, it's time to make the caramel sauce.
Pour in sugar and water into a small pot. Place on stove on medium-high heat. You will want to whisk and swirl the pot around until all of the sugar is dissolved. Keep swirling the pan often while keeping a close eye on the color of the sugar water. It should turn a light amber color. If you continue letting it cook it will get darker and darker, providing a more rich and bold caramel flavor. How dark you want it is completely up to you - I prefer mine lighter vs. darker.
DO NOT WHISK! Continue to swirl the pot using the handle so you do not disrupt the caramelization process that's taking place. Don't do it!! You'll have to start over!!
Once the sugar water has reached a color you are satisfied with then it's time to
pour in the cream with extreme caution adding it S L O W L Y and C A R E F U L L Y. The sugar water will bubble like scary-crazy for a few seconds and will settle back down. Now it's time to whisk again...until smoothy. Remove the pan from heat and whisk in the butter, vanilla and salt. Set your gorgeous, homemade caramel to the side to let it cool completely and thicken.
Cooling the Brownie Crust
When brownie crust is done baking, remove it from the oven and carefully remove the outer ring of the springform pan.
Let the brownie crust cool completely.
Homemade Fudge Sauce
If you are doing a homemade version, now would be a great time to make it while the brownie and caramel are cooling. I use
Brown-Eyed Baker's Hot Fudge Sauce recipe - delicious!
Cheesecake Filling
Time to make the cheesecake filling. In a large mixing bowl, combine cream cheese, brown sugar and granulated sugar until blended. Stir in the 3/4 cup of completely cooled caramel sauce and then add the spice(s). Mix well. Gently fold in the cool whip until it's fully incorporated - until you no longer see the white cool whip.
Put the outer ring back on the springform pan. Pour the cheesecake mixture on top of the baked brownie and spread using a rubber spatula until it's smooth and even. Chill in refrigerator for 3-4 hours. (
I say cover after 3-4 hours and continue to chill overnight for best results).
Once chilled, carefully remove the outer ring of the springform pan. Using the leftover homemade caramel sauce and a spoon, drizzle it all over the cheesecake in a crosshatch pattern. (
top to bottom first and then left to right). Sprinkle on the pecans -
they stick nicely to your caramel. Now drizzle on the hot fudge using the same crosshatch pattern.
TIP:
When drizzling the caramel + fudge come past the edge and let it drip off the sides of the cheesecake. Your countertop will be messier but your cheesecake will be prettier! Ha!!
see photo above.
Place on a pretty cake stand or serving plate.
Add birthday candles if appropriate and then slice and serve.
Keeps in refrigerator for up to a week in an airtight container.
Now...to be completely transparent...
there was one thing I wasn't a huge fan of regarding the outcome of this cheesecake.
(
and my family agreed with me).
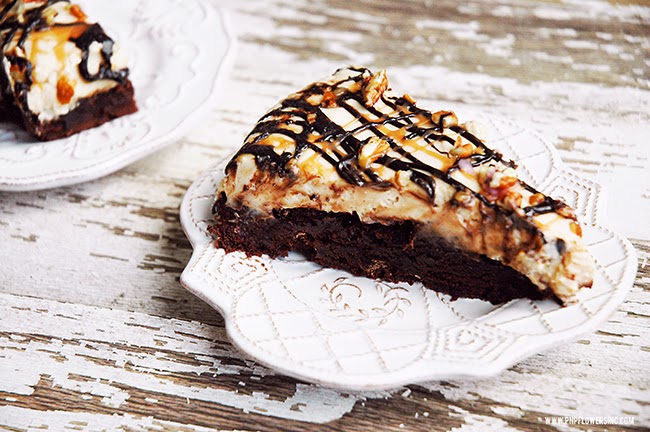
Look at how thick the brownie crust is compared to the cheesecake filling.
The crust looks perfect from the outer edge but when you cut into the cheesecake and view a piece from the side, it's super thick.
Too thick -
in my cheesecake-lovin' opinion
And as much as I LOVE the
Ghirardelli Triple Chocolate Brownie mix...
with it's rich chocolatey taste and those delicious chocolate chips baked inside...omgoodness!!
It really just proved to be too much crust for my taste.
I need crust with my cheesecake...
not cheesecake with my crust.
Here's what I'll be doing differently next time:
1. Trying an Oreo Cookie Crust (
1 package of crushed oreos + 1/2 cup melted butter - blended lightly with a fork and pressed into the bottom of a springform pan - no baking needed)
2. Trying a different creative finish for the garnish...like this
Toffee Cheesecake. It's a little more simple so if you prefer more turtle finish then I would stick with the crosshatching shown in this post.
3. Skipping the Homemade Hot Fudge to eliminate one of the steps and just buy a jar instead.
Although it was pretty delicious and I still have a large amount left in the fridge. *wink*
Oh I do hope you'll try this delicious cheesecake.
Overall it was a huge hit -
aside from the crust being a bit thick.
It's no-bake creamy filling definitely got a thumbs up from my family and I!!
And I'm telling you...that Ghirardelli Brownie Mix!? SO. GOOD.
I will definitely be using that again for our brownie cravings around here.
KEEPiNG iT REAL
I let my caramel get a little too dark...so dark, when my girls got home from school they all thought there was a pan of chocolate sauce cooling on the counter. I almost made another batch but
lucky for me I used a "special dark" cocoa to make the homemade hot fudge and it turned out WAY dark. The caramel sauce actually looked a lot lighter up against the dark chocolate fudge sauce so it all worked out. You'd never even know from the photos.


